
The animation editor#
The editor has an animation workspace for making and changing .anim clips on a rig in the scene.
What it shows is what plays: the preview samples the clip with the same code a track uses, turns the
joints the way the runtime turns them, and runs the rig's IK and springs after the clip.
To play the clips it makes, see Animations. For what the saved file holds, see Animation files.
Opening it#
Open it from the editor with any of:
- the Animate tab in the top bar;
- Window → Animation Editor;
- Ctrl+Shift+A.
Another tab, or the same shortcut, takes you back to the scene. Going back saves the changed clips, and coming back finds the same clip, rig and playhead.
The workspace opens the last clip you had, or the first clip in animations/. Clips live in the
place's animations folder, and a new clip is saved as animations/<name>.anim.
The workspace#
The workspace has a top bar, a rig panel, the viewport, an inspector and a timeline.
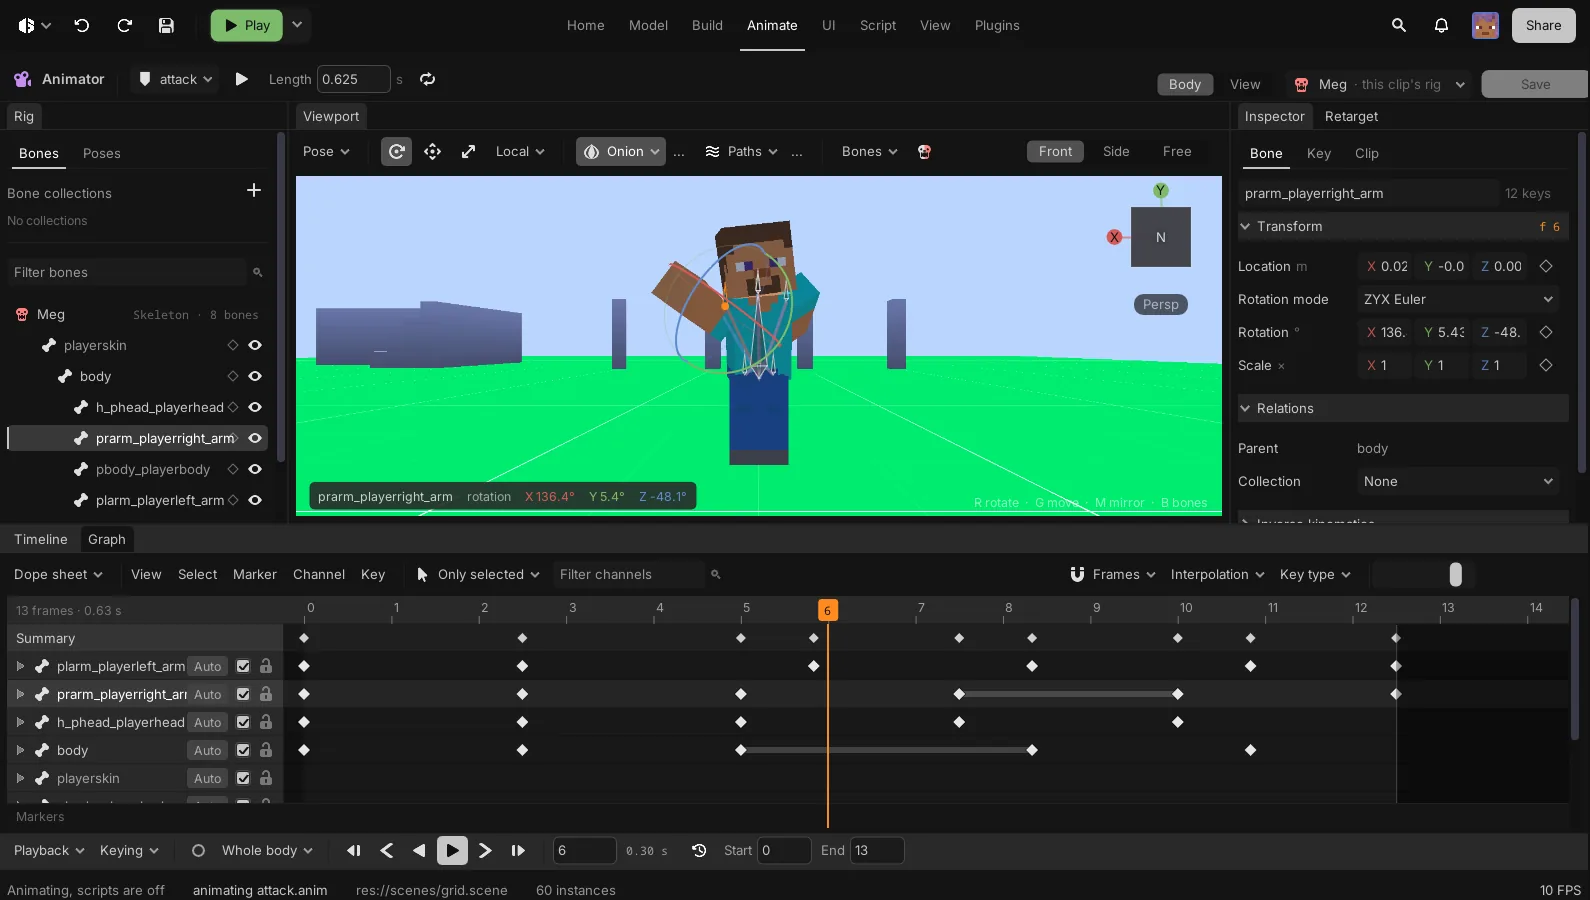
Top bar#
- The clip menu lists the rig's clips and has New, Duplicate, Rename, Delete, Import from Blockbench and Export as .bbmodel. See Blockbench models.
- A dot by the clip's name means unsaved changes.
- Next to it: autoplay, the length in seconds, and loop.
- On the right: Body or View sets the clip's
space, the rig picker chooses what the clip is shown on, and Save writes it.
Rig panel#
The Bones tab holds bone collections and the bone tree.
- Each collection has a colour, a name and its bones, with Select and an eye that hides them in the viewport. Ctrl click a collection to select its bones. Right-click it to assign or remove the selected bones, rename it or delete it. + makes one from the selection.
- In the bone tree, each bone has a bar in the colour of its collection, a diamond filled when the
bone is keyed at the playhead, and an eye to hide it. A bone an
IKControldrives has an IK tag; click it to edit the control's handles. - Click selects a bone, Shift click adds one.
The Poses tab is the pose library, see poses.
Viewport#
The rig at the playhead. The toolbar has:
- the Pose menu;
- the rotate, move and scale gizmos, and the gizmo space: Local, World or Parent;
- onion skin and motion paths, with their options;
- how bones are drawn: octahedral, stick or hidden, with names and axes;
- Front, Side and Free views.
Inspector#
Three tabs:
- Bone: the selected bone's location, rotation and scale. Each row has a key button and a
diamond, filled when the row is keyed at the playhead and red while auto key is on. Below them: the
rotation mode, the bone's parent and collection, the
IKControlthat drives it, and limits. - Key: the active key, its frame, value, type, interpolation with the easings, the easing direction and the two handle types, then the curve modifiers of its channel. A selected marker, event, sound or clip cue shows here too.
- Clip: length, frame rate, loop (none, hold, wrap or ping-pong), autoplay, speed, priority, blend, the mask by bone collection, and Add track for a bone, a function call, a sound or another clip.
The Retarget tab sits next to the inspector, see retargeting.
Timeline#
The timeline is a dope sheet:
- a summary row, then a row per track with its keys drawn in their key type's shape and colour: keyframe white, breakdown small and cyan, extreme large and pink, jitter small and green, moving hold dark;
- hold bars where a value holds;
- on the right of each track, its settings: the interpolation of new keys, mute and lock;
- an arrow that opens a track on its rotation, position and scale rows;
- below the tracks, the sound, call and clip rows, and the markers along the bottom.
A track whose name no bone of the rig has shows missing; it only plays on a rig that has it.
The menus are View, Select, Marker, Channel and Key. They hold Only selected, a channel filter, snapping, interpolation and key type for the selected keys, and zoom.
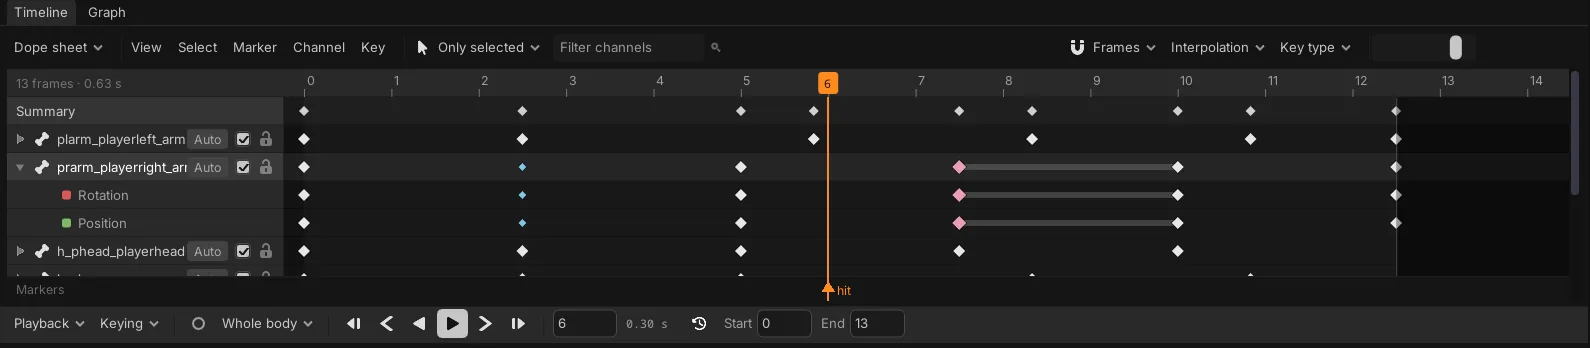
Graph draws the curves of the selected bones in their axis colours, with their bezier handles coloured by handle type.

Right-click a key for its type, interpolation and handle type:
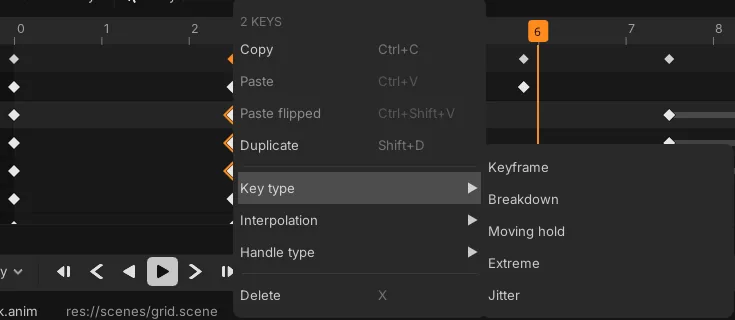
The footer holds:
- Playback: audio while scrubbing, follow the playhead, and speed;
- Keying: the type of new keys, only key what changed, and only replace keys;
- auto key and the keying set;
- jump to start, previous key, play backwards, play, next key and jump to end;
- the current frame, and the preview range with its start and end.
The Graph tab next to the timeline edits animation graphs, see animation graphs.
Posing and keying#
A change to a bone poses it without keying it, and the pose goes when the playhead moves. To key it, press K, the key button on a row, or Insert key. With auto key on, every change keys at the playhead.
The keying set says what K keys: the whole body, the selected bones, rotation only, or location and rotation.
Keys land on frames while snapping is on; it can snap to tenths of a second or to markers instead. The frame rate is only the editor's grid, and the runtime plays the curves at any time. A locked track's keys do not move or change.
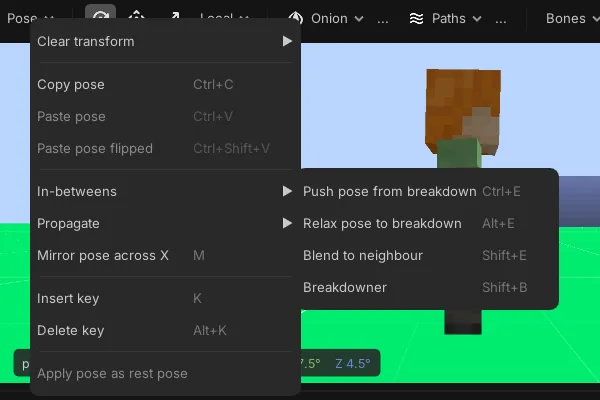
The Pose menu#
- Clear the location, rotation or scale of the selected bones.
- Copy the pose and paste it, or paste it flipped.
- Mirror, and insert and delete keys.
- Propagate copies the pose to the next key, the last key or the selected keys.
- On a model, Apply pose as rest pose makes the pose the bones' rest, as one undoable scene edit.
- The in-betweens show a slider over the viewport:
- Push moves the pose away from the in-between of the keys either side;
- Relax moves it toward it;
- Blend to neighbour slides it toward the previous or the next key;
- the Breakdowner picks a point between them.
Onion skin and motion paths#
Onion skin draws the poses one to three steps before and after the playhead, stepping by keys or by frames, only where the pose differs. The past is red and the future blue.
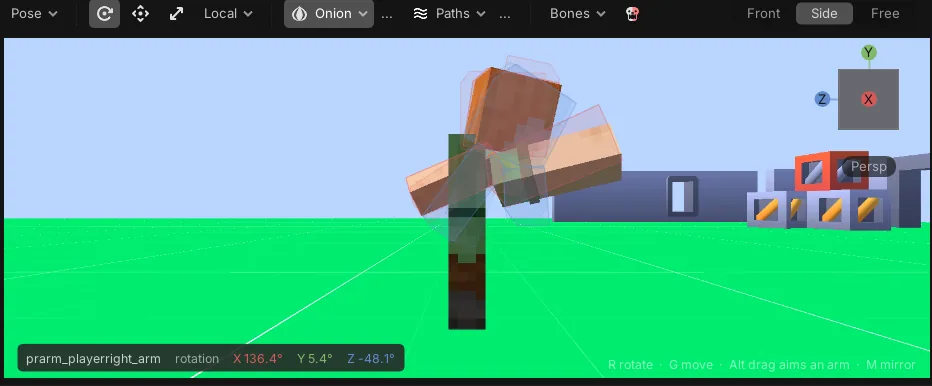
Motion paths are worked out when you ask, around the playhead or for the whole clip, and show the frame number of each key.
Poses#
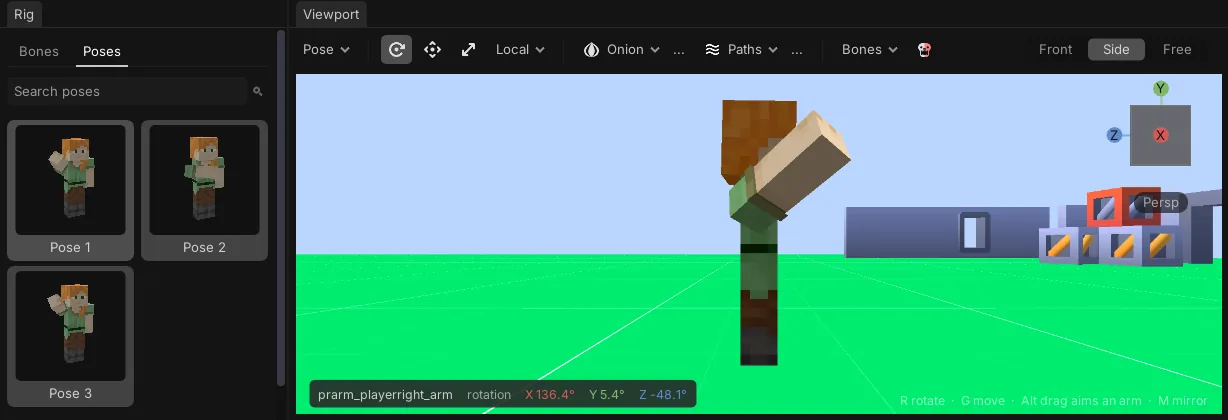
The Poses tab in the rig panel is the pose library. Each card is a real render of the rig in that pose.
- Hover a pose to see it on the rig in the viewport.
- Click to apply it, drag sideways to blend into it, and Ctrl click for the other side.
- Right-click to apply it flipped, select or deselect its bones, update it from the pose on the rig, rename it or delete it.
- Save the current pose saves the selected bones, or all of them.
Saving clips#
A clip is saved in the runtime's format, version 3, with a few fields the
runtime reads past: fps, each event's preview, viewModel, and each track's locked and
interpolation.
A clip written in the first format, or in the editor's early format with channels, opens as it is
and is written as version 3 when you save it. The top bar says so while it is open.
Saving a clip drops the copy the engine keeps, so the next track that plays it reads the new file. Play the place after saving, and the scripts that play the clip play the change.
Renaming a clip renames the file and points every Animation and script that named it at the new
name.
Rigs#
The rig picker in the top bar chooses what the clip is shown on. Every rig in it is drawn for real, with its kind, its number of bones, and how many of the clip's tracks it can play: green when all of them, yellow with the count when some, red when none. Picking a rig that cannot play every track says how many will not move.
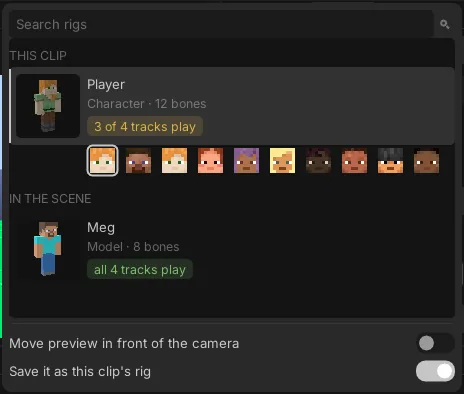
| Section | |
|---|---|
| This clip | the rig the clip names in rig |
| Selected in the scene | a model or a body selected in the scene |
| In the scene | every Model with an AnimationController and at least one Bone or Motor, and the characters the place already has |
| Player | a body with your skin, with the default skins as a row of faces under it |
| Blockbench meshes | .bbmodel meshes placed as plain MeshParts, rigged when picked, see dragging a .bbmodel into the scene |
- A character from the scene is lent to the editor with its own skin and controls, and handed back as it was when you pick something else or leave.
- The player rig stands in front of the camera and is not part of the scene. Move preview in front of the camera puts it back there when it is picked.
- Save it as this clip's rig writes the picked rig into the clip's
rig.
A clip remembers its rig in rig: player, view, or, for a model made from a .bbmodel, the
res:// path of that file. Opening a clip shows it on a model in the scene made from that file, so a
clip opens on any copy of the model. Older clips that name a model by its name still find it.
Undo keeps the clip you have open:
- When undo takes away the model you are animating, the clip stays open on the preview character. Redo brings the model back and shows the clip on it again.
- Undoing a key change in a clip that is not open changes that clip without opening it, and the status bar says which one.
Rig settings and poses on disk#
A rig keeps what the editor knows about it in its clip folder: animations/ for the player and
animations/<model>/ for a model. Both files below are plain files of the place, saved and synced
like a clip.
rig.json holds the bone collections, the bones hidden in the viewport, and the bones' limits:
{
  "version": 1,
  "collections": [
    { "name": "Body", "color": "#d65a56", "bones": ["torso", "head"] },
    { "name": "Legs", "color": "#7eba66", "bones": ["rightLeg", "leftLeg"], "visible": false }
  ],
  "hidden": ["cape"],
  "limits": { "head": { "lock": ["z"], "min": [-60, -80, 0], "max": [40, 80, 0] } }
}
The player rig starts with Body, Arms and Legs until it has a rig.json. A locked axis never turns,
and min and max clamp the angles the gizmo and the fields can reach.
poses/<name>.pose is one pose of the pose library, the values of the bones it holds:
{ "version": 1, "joints": { "rightArm": { "rotation": [28, 0, 0] }, "torso": { "position": [0, -0.1, 0] } } }Retargeting#
The Retarget tab, next to the inspector, plays the open clip on the rig picked in the top bar when that rig names its bones differently.
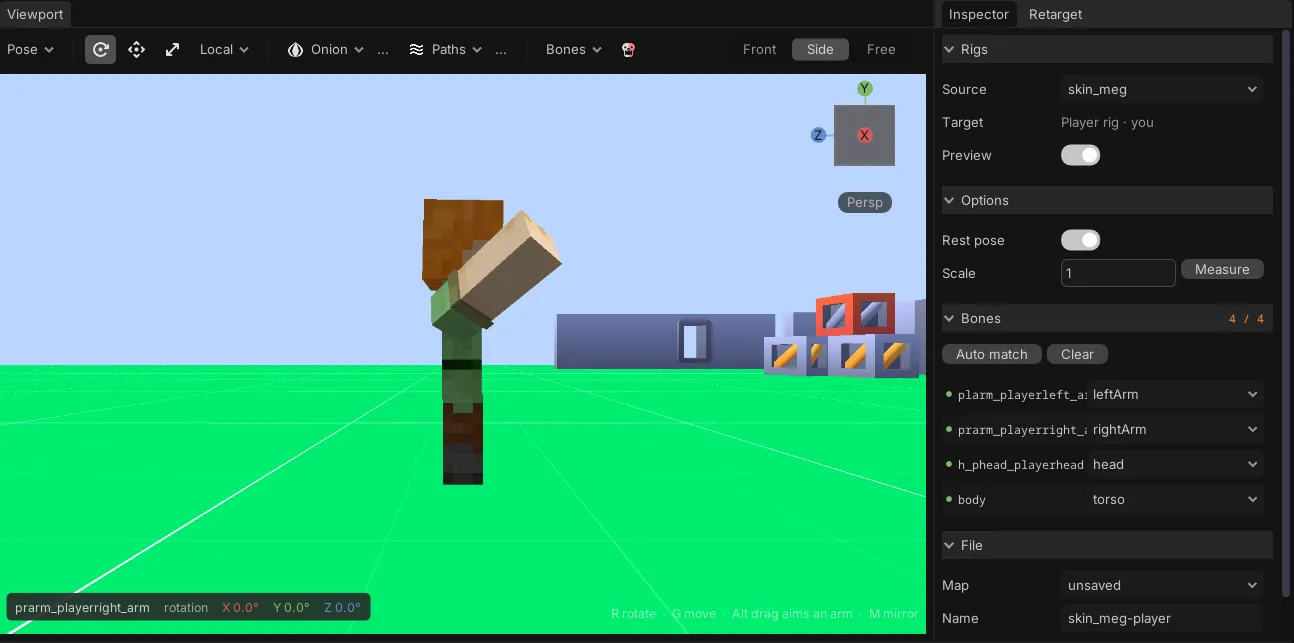
- Source is the rig the clip was made on, its
rigto begin with. Target is the picked rig. Preview shows the clip through the map in the viewport. - Rest pose carries each joint's turns across rigs whose bones rest differently. It reads the
rests from a model of the source rig in the scene, or from its
.bbmodel; the player rests unturned. - Scale multiplies positions, and Measure sets it from the two rigs' heights.
- The bone list has every bone track of the clip and the rig joint it plays on, green when it has
one. Auto match matches them by name the way
"auto"does, and Clear empties the column. - Save writes the map as a
.retargetfile inanimations/. Click its path to copy it forretargetId. Map opens a saved one. - Bake clip writes a copy of the clip keyed on the target rig's own joints,
<clip>-<rig>.animin that rig's clip folder, which plays there with no map.
The map starts again from a name match when another clip or rig is picked.
Animation graphs#
The Graph tab, next to the timeline, edits .animgraph files. The menu
on the left lists the place's graphs and makes a new one in animations/, and Save writes it.
Edits go in the editor's undo history.
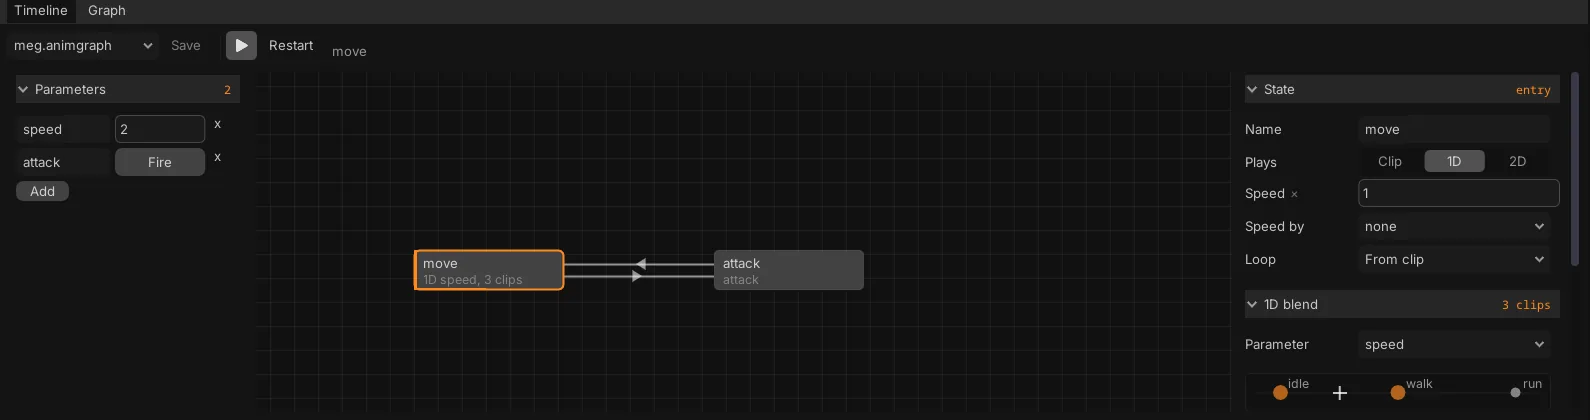
Parameters, on the left. Add makes a number, a bool or a trigger. Rename one in place, and every condition and blend that reads it follows. The field beside it is its default.
States, in the middle. Each state is a box with what it plays, and the entry state is marked in orange on its left. Any is for transitions from every state.
- Right-click the background to add a state, a 1D blend or a 2D blend.
- Right-click a state to add a transition from it, then click the state it goes to. The same menu sets it as the entry, duplicates it or deletes it.
- Drag a state to move it. Drag the background with the right or middle button to pan. Delete removes what is selected.
The selection, on the right:
- A state shows its name, what it plays (Clip, 1D or 2D), its speed, the parameter its speed follows and its loop, then its clip or its blend space, and the transitions leaving it.
- A blend space draws its clips as dots, bigger and brighter the more they weigh, with a cross at the parameters' values. Drag a dot to move the clip, or drag the background to move the cross.
- A transition has its two states, the fade, the exit time and its conditions.
The play button in the tab's toolbar plays the graph on the picked rig. While it plays:
- the parameter fields drive the preview instead of the defaults, and Fire fires a trigger;
- the state playing shows its progress along its bottom edge;
- a transition lights up while it fades;
- with the Retarget tab's preview on, the graph plays through that map too.
Script events#
An event is a name at a time with a payload. The inspector edits the payload as a table of fields, or as a single value for an event that carries a string or a number.
Fires on is the event's on: server, client or both. A server event fires only on the
server, and a client event only on the clients, which is where sounds and particles belong.
Scripts hear an event with getMarkerReachedSignal, and the payload arrives as a table:
--!strict
local body = world:find("npc") :: Character
local swing = world:add("Animation", {
    name = "swing",
    animationId = "res://animations/swing.anim",
}) :: Animation
local track = body.animator:loadAnimation(swing)

track:getMarkerReachedSignal("hit"):connect(function(payload: any)
    print(payload.damage, payload.side)
end)
track:play()- The inspector writes this handler for the selected event, with its clip and fields filled in, and Copy snippet puts it on the clipboard.
- Listeners in this place lists the scripts that already connect to that name. Click one to open it at the line.
- Preview in editor plays a sound and shows particles in the viewport when the playhead passes
the event, so you can judge its timing without playing the place. The sound and particle are only
for the editor: they are saved in the event's
preview, and the runtime ignores them.
IK and spring handles#
A bone an IKControl drives has an IK tag in the bone tree. Click it to select the control and
show its properties in the inspector.
In the viewport, an IKControl's target is a diamond and its pole a circle, each joined to the chain
by a dashed line. Drag them to move targetCframe, or the part or attachment the control points at.
A JointSpring is drawn as its axis, out to length. Moving a handle is an undoable scene edit.
The preview solves the controls after the clip on every frame, so the pose in the viewport is the one a client draws. See IK and springs.
Keys and shortcuts#
Playing and moving in time:
| Key | |
|---|---|
| Space | play and pause |
| Ctrl+Shift+Space | play backwards |
| Home, End, or Shift+Left, Shift+Right | the start or the end of the clip, or of the preview range |
| Left, Right | one frame back or on |
| Up, Down (timeline) | the next or the previous key |
Posing in the viewport:
| Key | |
|---|---|
| R, G, S | the rotate, move or scale gizmo |
| X | the gizmo turns with the joint, or stays on the world's axes |
| K, Alt+K | key the keying set at the playhead, or delete the selected bones' keys there |
| N | auto key on or off |
| Alt+G, Alt+R, Alt+S | clear the selected bones' location, rotation or scale |
| Ctrl+E, Alt+E, Shift+E, Shift+B | push, relax, blend to neighbour, breakdowner; Enter keeps, Esc puts it back |
| H | hide the selected bones |
| B | bones drawn or hidden |
| M | mirror the selected joint's pose to the other side |
| Ctrl while dragging the gizmo | snap to 15 degrees, a sixteenth of a block, or a tenth of the scale |
| Alt and drag an arm | aim a body's arm at the pointer |
| V | in a view clip, look through the camera bone |
| Numpad 5 | orthographic view |
In the timeline:
| Key | |
|---|---|
| A, Alt+A, Ctrl+I | select every key, none, or the others |
| K, [, ], Ctrl+L | select the columns of the selected keys, the keys before or after the playhead, or every key on their channels |
| I | insert keys |
| X, Shift+D, S | delete, duplicate or scale the selected keys around the playhead |
| Shift+O | bake the selected channels to a key per frame |
| M | add a marker at the playhead |
| Shift+W, Tab | mute or lock the selected tracks |
| Ctrl+Tab, Ctrl+T, Ctrl+P | dope sheet or graph, frames or seconds, the preview range |
Everywhere:
| Key | |
|---|---|
| Ctrl+C, Ctrl+V, Ctrl+D | copy, paste and duplicate keys; paste lands at the playhead |
| Delete | delete the selected keys, event, marker, sound or clip cue |
| Ctrl+S | save the clip |
| Ctrl+Z, Ctrl+Y | undo and redo, for keys, events and control handles alike |
With the mouse, in the timeline:
- drag a key to move it in time;
- Shift or Ctrl click to add to the selection, and drag across empty lanes to select a box of keys;
- Ctrl and the wheel zoom the time, Shift and the wheel scroll it;
- right-click a lane to add a key, a marker, a call or a sound.
In the graph, drag a key up and down to change its value, and hold Alt to keep its time. Dragging an automatic handle makes it aligned.